Plugin System Detailed Guide
📋 Table of Contents
- Plugin System Overview
- Plugin Management
- Plugin Installation and Usage
- Plugin Types Introduction
- Plugin Development Guide
- Plugin Configuration Management
- Frequently Asked Questions
- Plugin Development Best Practices
- Plugin Marketplace
🌟 Plugin System Overview
Aiverything Plugin System is a powerful extension framework that allows users to enhance the search tool's functionality by installing plugins. The plugin system adopts a modular design, supports multiple technology stacks, and provides unlimited extension possibilities for users.
Core Features
- 🔌 Modular Architecture - Plugins run independently without interfering with each other
- 🎨 Flexible Interface - Supports both embedded and standalone window display modes
- 🔧 Hot Swapping - Supports dynamic loading and unloading of plugins
- 📦 Package Management - Complete plugin lifecycle management
- 🛡️ Security Isolation - Plugins run in independent secure environments
Plugin System Advantages
- Functionality Extension: Implement personalized needs through plugins
- Easy to Use: Simple installation and management process
- Performance Optimization: Load on demand, does not affect main program performance
- Developer Friendly: Complete SDK and development documentation support
🔍 Plugin Management
Entering Plugin Mode
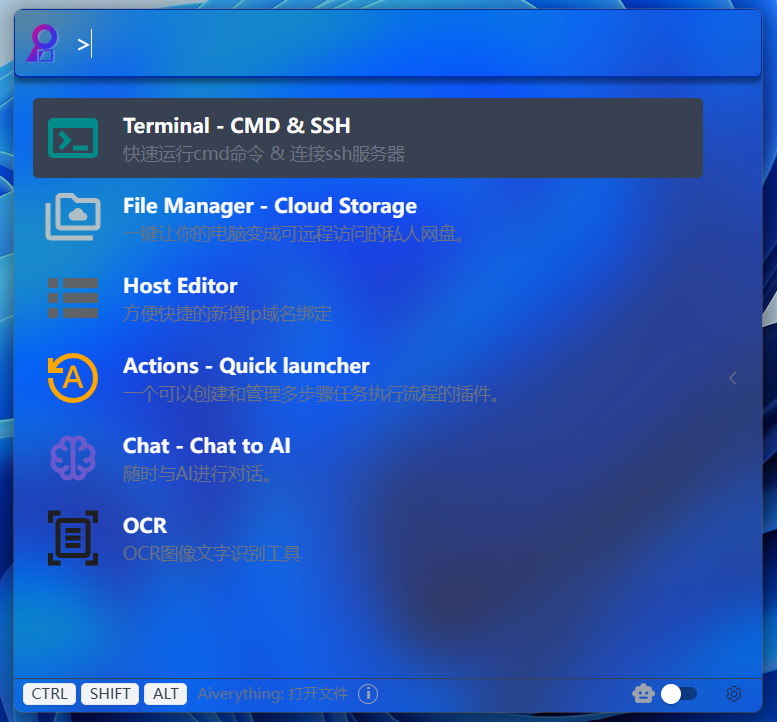
Operation Steps:
- Open Aiverything main interface
- Enter
>symbol in the search box - Enter plugin name or keywords to search
- System will automatically switch to plugin mode and display matching plugin list
> [Plugin name or keywords]Examples:
>action          # Search for Action plugin
>terminal        # Search for Terminal plugin
Plugin Browse Interface
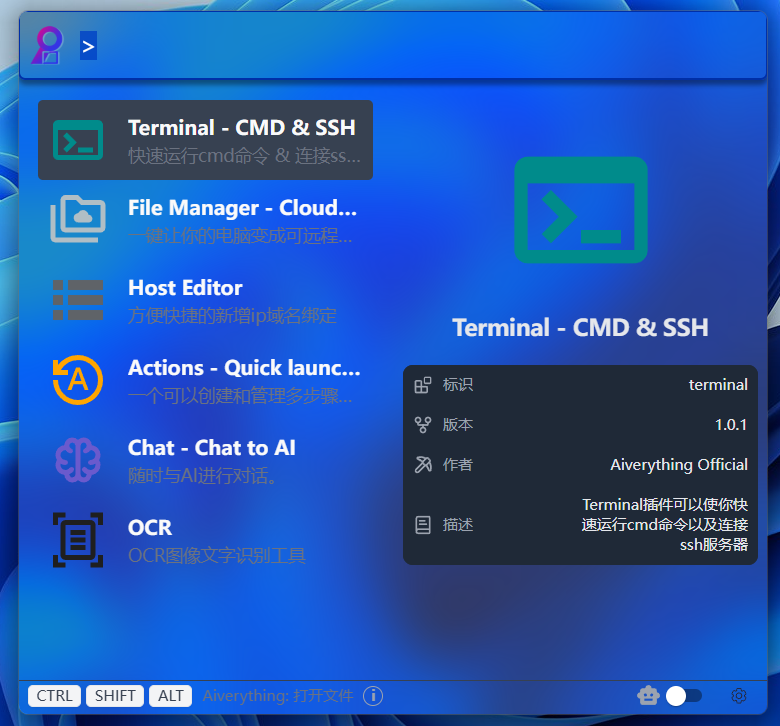
View Plugin Information Steps:
- After entering plugin mode, browse the plugin list
- Each plugin item displays basic information: icon, name, description
- View plugin version number and compatibility information
- Click plugin item to view more detailed information
Plugin mode interface contains the following information:
- Plugin Icon: Visual identifier of the plugin
- Plugin Name: Display name of the plugin
- Plugin Description: Brief description of plugin functionality
- Version Information: Current plugin version number
📦 Plugin Installation and Usage
Plugin Installation Process
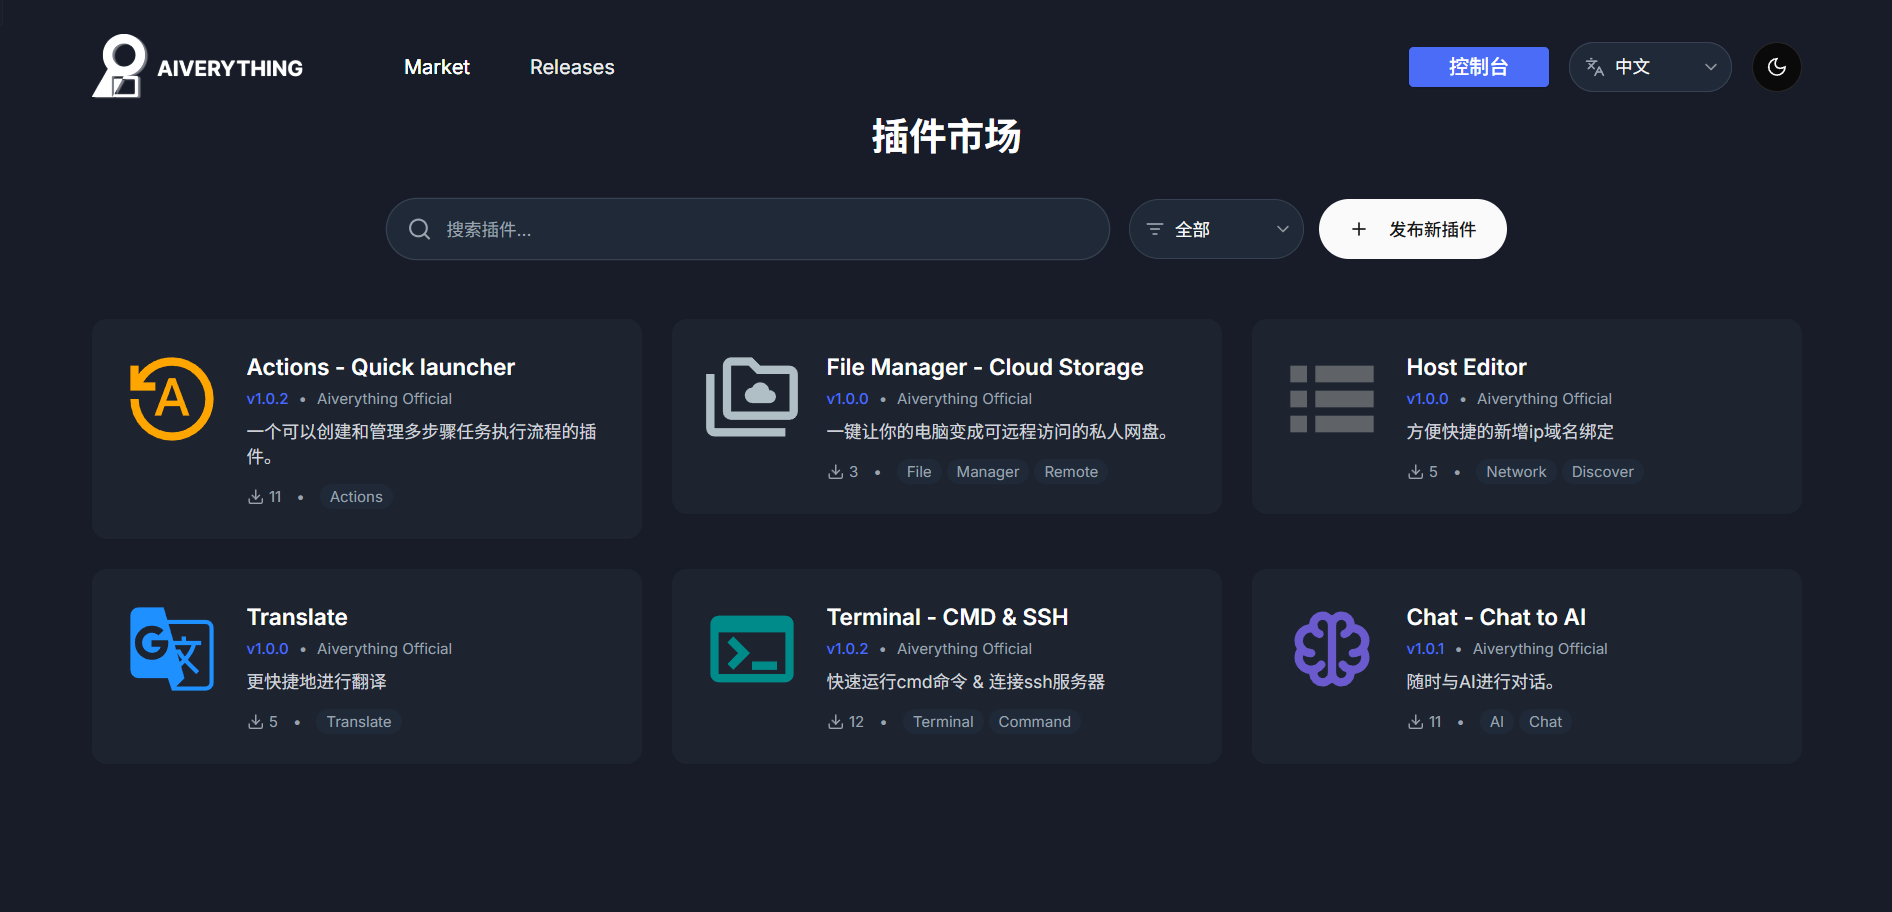
Steps to Enter Plugin Marketplace:
- Click the "Plugin Marketplace" button at the bottom of the taskbar menu or plugin settings left sidebar
- Browse all available plugin category lists
- Use search function to quickly find target plugins
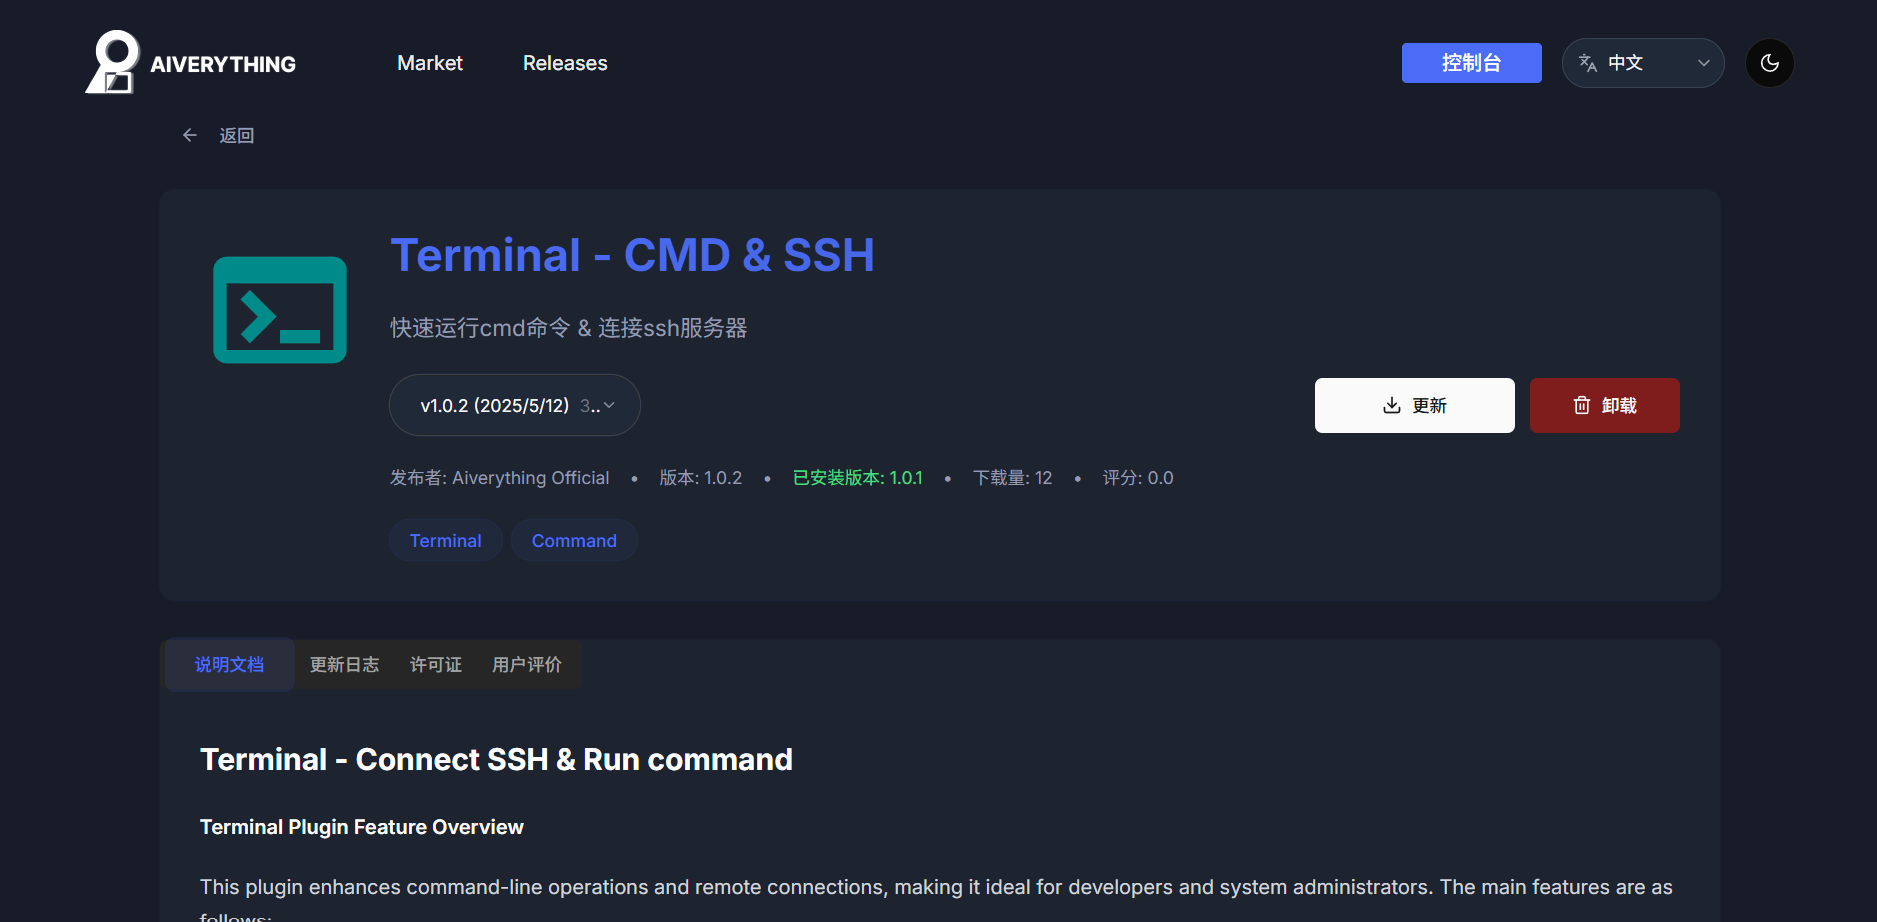
Detailed Plugin Installation Steps:
- Find the desired plugin in the plugin marketplace
- Click the plugin card to view detailed information
- Read plugin description, version information, and user reviews
- Click the "Install" button to start downloading
- Wait for installation completion, system will display installation status
- After successful installation, the plugin will be automatically added to your plugin list
Plugin Usage Methods
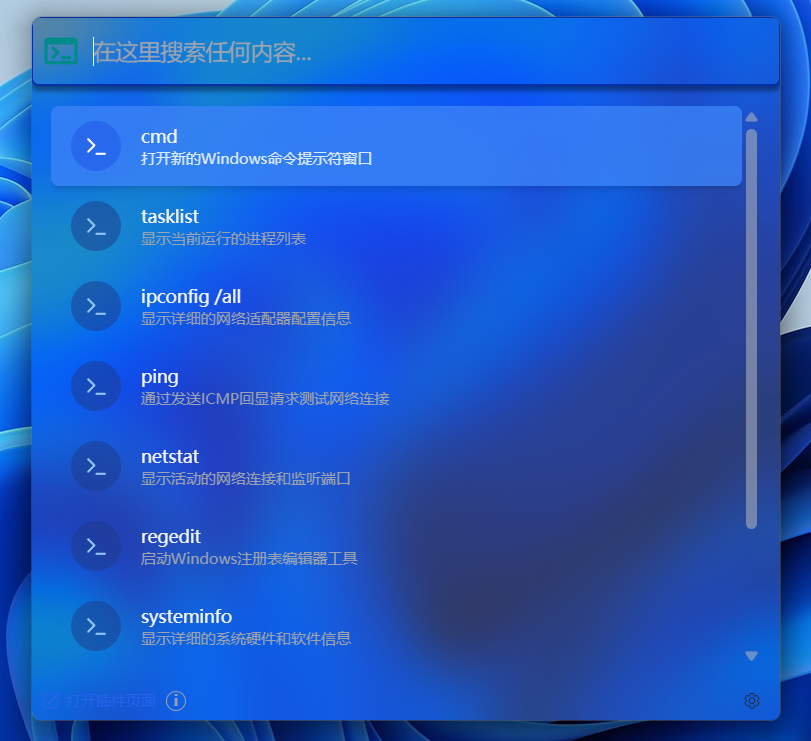
Detailed Steps to Use Plugins:
- Enter
>in the search box to enter plugin mode - Enter plugin name or keywords to search
- Select the plugin you want to use from search results
- Follow the plugin interface prompts for specific operations
Embedded Plugin Usage
Embedded plugins display directly within the search interface:
Standalone Window Plugin Usage
Standalone window plugins will open new windows:
>notepad # Open notepad pluginPlugin Management Operations

Detailed Plugin Management Steps:
- Click the settings button to enter plugin management interface
- View installed plugin list and status
- Specific plugin management operations:
- Configuration Settings: Click settings icon to configure plugin parameters
- Uninstall Plugin: Click delete button to remove unwanted plugins
- Update Plugin: Check and install plugin updates
❓ Frequently Asked Questions
Plugin Installation Issues
Q: What to do if plugin installation fails?
A: Troubleshooting Steps
Check Network Connection
- Ensure network connection is normal
- Check firewall settings
Check System Requirements
- Confirm plugin compatibility
- Check if dependencies are met
Clear Cache
- Clear plugin download cache
- Retry installation
Permission Check
- Ensure sufficient system permissions
- Try running as administrator
Q: Plugin cannot start?
A: Solutions
Check Java Environment (Java plugins)
- Check Java version compatibility
View Plugin Logs
- Open plugin log files
- Look for error information
Reinstall Plugin
- Uninstall problematic plugin
- Re-download and install
Plugin Performance Issues
Q: Plugin running slowly?
A: Optimization Suggestions Resource Monitoring
- Check plugin resource usage
- Close unnecessary plugins
📞 Getting Help and Support
Official Support Channels
- Plugin Documentation: https://docs.aiverything.me/plugins/
- GitHub Issues: https://github.com/aiverything/plugins/issues
- QQ Developer Group: 893463594
Community Resources
- Plugin Templates: Open source template projects on GitHub
- Code Examples: Official example code repository
Technical Support
If you encounter problems during plugin development or usage:
- Check Documentation: First refer to official documentation and API descriptions
- Search Forums: Search for similar issues in developer forums
- Submit Issue: Create new issue reports on GitHub
- Contact Support: Contact technical support through official channels
Thank you for using the Aiverything Plugin System! We look forward to seeing you create more excellent plugins and provide better experiences for users.
🔧 Plugin Development Guide
Development Environment Setup
Prerequisites
- Java Development Kit: JDK 21 or higher
- Node.js: For web-based plugin development
- Aiverything SDK: Development toolkit and APIs
1. Install SDK
# For Java plugins
mvn dependency:add com.aiverything:plugin-sdk:1.0.0

# For web plugins
npm install @aiverything/plugin-sdk
2. Create Plugin Project
# Using Aiverything CLI
npx @aiverything/cli create-plugin my-awesome-plugin
cd my-awesome-plugin
3. Project Structure
my-plugin/
├── plugin.json          # Plugin manifest
├── src/
│   ├── main/
│   │   ├── java/        # Java source files
│   │   └── resources/   # Resources and assets
│   └── web/             # Web UI components
├── docs/                # Plugin documentation
└── tests/               # Unit and integration tests
Basic Plugin Structure
Plugin Manifest (plugin.json)
{
  "id": "com.example.my-plugin",
  "name": "My Awesome Plugin",
  "version": "1.0.0",
  "description": "A plugin that does awesome things",
  "author": "Your Name",
  "website": "https://example.com",
  "main": "com.example.MyPlugin",
  "apiVersion": "1.0",
  "permissions": [
    "filesystem.read",
    "network.request",
    "ui.modify"
  ],
  "dependencies": {
    "aiverything-core": ">=2.0.0"
  },
  "categories": ["productivity", "search"],
  "keywords": ["search", "automation", "productivity"]
}
Java Plugin Example
package com.example;

import com.aiverything.plugin.Plugin;
import com.aiverything.plugin.PluginContext;
import com.aiverything.plugin.annotations.PluginMain;

@PluginMain
public class MyPlugin extends Plugin {

    @Override
    public void onEnable(PluginContext context) {
        // Plugin initialization
        getLogger().info("My Plugin enabled!");

        // Register search provider
        context.getSearchManager().registerProvider(
            new CustomSearchProvider()
        );

        // Register UI components
        context.getUIManager().addMenuItem(
            "My Plugin", this::showPluginDialog
        );
    }

    @Override
    public void onDisable() {
        // Cleanup when plugin is disabled
        getLogger().info("My Plugin disabled!");
    }

    private void showPluginDialog() {
        // Show plugin interface
    }
}
Web Plugin Example
import { Plugin, SearchProvider } from '@aiverything/plugin-sdk';

export default class MyWebPlugin extends Plugin {
    async onActivate(context) {
        console.log('Web plugin activated!');

        // Register custom search provider
        await context.search.registerProvider({
            name: 'my-search',
            search: this.customSearch.bind(this)
        });

        // Add UI components
        context.ui.addToolbarButton({
            icon: 'star',
            tooltip: 'My Plugin',
            onClick: this.showInterface.bind(this)
        });
    }

    async customSearch(query, options) {
        // Implement custom search logic
        return {
            results: [
                {
                    title: 'Custom Result',
                    path: '/path/to/file',
                    score: 0.95
                }
            ]
        };
    }

    showInterface() {
        // Show plugin UI
    }
}
Plugin APIs
Core APIs
File System API
// Java
FileSystemAPI fs = context.getFileSystem();
List<FileInfo> files = fs.searchFiles("*.txt");
String content = fs.readFile("/path/to/file.txt");

// JavaScript
const fs = context.filesystem;
const files = await fs.searchFiles("*.txt");
const content = await fs.readFile("/path/to/file.txt");
Search API
// Java
SearchAPI search = context.getSearch();
SearchResults results = search.query("my query");
search.registerProvider(new MySearchProvider());

// JavaScript
const search = context.search;
const results = await search.query("my query");
await search.registerProvider(new MySearchProvider());
UI API
// Java
UIAPI ui = context.getUI();
ui.showNotification("Hello from plugin!");
ui.addMenuItem("My Action", this::myAction);

// JavaScript
const ui = context.ui;
ui.showNotification("Hello from plugin!");
ui.addMenuItem("My Action", this.myAction);
Advanced APIs
Database API
const db = context.database;

// Store plugin data
await db.set('my-key', { data: 'value' });

// Retrieve plugin data
const data = await db.get('my-key');

// Query data
const results = await db.query({
    collection: 'my-collection',
    filter: { type: 'document' }
});
Network API
NetworkAPI network = context.getNetwork();

// Make HTTP request
HttpResponse response = network.get("https://api.example.com/data");

// Download file
network.downloadFile("https://example.com/file.zip", "/local/path");
AI API
const ai = context.ai;

// Generate text
const response = await ai.generateText({
    prompt: "Summarize this document",
    model: "llama2"
});

// Analyze content
const analysis = await ai.analyzeContent(fileContent, {
    tasks: ['summarize', 'extract-keywords']
});
Plugin Categories
1. Search Enhancement Plugins
- Custom Search Providers: Add new search sources
- Search Filters: Advanced filtering options
- Result Processors: Modify and enhance search results
2. Content Analysis Plugins
- File Analyzers: Extract metadata and content
- Text Processors: Natural language processing
- Image Analyzers: Computer vision capabilities
3. Integration Plugins
- Cloud Storage: Google Drive, Dropbox, OneDrive
- Productivity Tools: Notion, Obsidian, Roam Research
- Development Tools: Git, IDE integrations
4. Automation Plugins
- Workflow Automation: Automated file processing
- Scheduled Tasks: Background operations
- Event Handlers: React to file system changes
Plugin Distribution
Plugin Store
- Official Store: Curated plugins from Aiverything team
- Community Store: User-contributed plugins
- Private Store: Enterprise plugin distribution
Installation Methods
- Store Installation: One-click install from plugin store
- Manual Installation: Install from .aip files
- Development Mode: Load plugins during development
Plugin Packaging
# Build plugin
aiverything-cli build

# Package for distribution
aiverything-cli package

# Publish to store
aiverything-cli publish --store official
Security and Permissions
Permission System
Plugins must declare required permissions:
{
  "permissions": [
    "filesystem.read",      // Read files
    "filesystem.write",     // Write files
    "network.request",      // Make network requests
    "ui.modify",           // Modify user interface
    "system.execute",      // Execute system commands
    "database.access"      // Access plugin database
  ]
}
Security Sandbox
- Isolated Execution: Plugins run in secure containers
- Resource Limits: CPU, memory, and network limits
- API Restrictions: Limited access to system APIs
- Code Signing: Verified plugin authenticity
Testing and Debugging
Unit Testing
// Java JUnit example
@Test
public void testSearchProvider() {
    MySearchProvider provider = new MySearchProvider();
    SearchResults results = provider.search("test query");
    assertEquals(1, results.size());
}// JavaScript Jest example
test('search provider returns results', async () => {
const provider = new MySearchProvider();
const results = await provider.search('test query');
expect(results).toHaveLength(1);
});Integration Testing
# Run integration tests
aiverything-cli test --integration

# Test with different Aiverything versions
aiverything-cli test --version 2.0.0
Debugging
- Debug Mode: Enable detailed logging
- Plugin Inspector: Real-time plugin state inspection
- Performance Profiler: Identify performance bottlenecks
Best Practices
Development Guidelines
- Follow Naming Conventions: Use clear, descriptive names
- Handle Errors Gracefully: Implement proper error handling
- Optimize Performance: Minimize resource usage
- Document Thoroughly: Provide comprehensive documentation
- Test Extensively: Write comprehensive tests
User Experience
- Intuitive Interface: Design user-friendly interfaces
- Clear Feedback: Provide status updates and progress indicators
- Configurable Options: Allow users to customize behavior
- Accessibility: Support keyboard navigation and screen readers
Security Considerations
- Minimal Permissions: Request only necessary permissions
- Input Validation: Validate all user inputs
- Secure Communication: Use HTTPS for network requests
- Data Protection: Encrypt sensitive data
Plugin Examples
Simple File Counter Plugin
@PluginMain
public class FileCounterPlugin extends Plugin {
    @Override
    public void onEnable(PluginContext context) {
        context.getUIManager().addMenuItem("Count Files", () -> {
            int count = context.getFileSystem().countFiles("*");
            context.getUIManager().showMessage("Total files: " + count);
        });
    }
}
Weather Integration Plugin
export default class WeatherPlugin extends Plugin {
    async onActivate(context) {
        context.ui.addWidget({
            name: 'weather',
            position: 'sidebar',
            render: this.renderWeather.bind(this)
        });
    }

    async renderWeather() {
        const weather = await this.fetchWeather();
        return `<div>Today: ${weather.temperature}°C</div>`;
    }

    async fetchWeather() {
        const response = await fetch('https://api.weather.com/current');
        return response.json();
    }
}
Community and Support
Resources
- Documentation: https://docs.aiverything.me/plugins
- API Reference: https://api.aiverything.me
- Examples: https://github.com/aiverything/plugin-examples
Community
- Discord: Join our developer community
- GitHub: Contribute to open-source plugins
- Forums: Get help and share ideas
Support
- Developer Support: Technical assistance for plugin developers
- Plugin Review: Get your plugin reviewed before publishing
- Certification Program: Become a certified plugin developer